Learn how to create your Web event step by step
Available for these licences:
![]() Virtual Venue Starter, Pro, Enterprise
Virtual Venue Starter, Pro, Enterprise
![]() Suite Starter, Pro, Enterprise
Suite Starter, Pro, Enterprise
In this article, we explain the minimum steps necessary to create an event Web 💻.
Create the Event
1. From your Meetmaps account, start by creating your event from scratch.
👉 How to create an event from scratch or clone it from an existing one?
TIP 💡add yourself as a registered attendee 🍋 in the Attendee List to see how the Web looks.
Web structure
2. Fill in the general information about the event (event name, dates, schedules, languages, social media, etc.).
👉 What is the General Information Module and where can we visualize it?
3. Brand the event in your Web with images and a main color.
4. Configure the modules you are going to use according to the license you have purchased:
👉 What modules exist according to your license?
5. Configure the main page 🏠 (or Home) of the Web if you have activated the Home module in the previous step -4-.
👉 How to configure the Home for the Virtual Web Event?
6. Edit the tabs in the Properties 🔧 section that you are going to use:
- Properties > Join Form: in case you have activated the Join form in Settings > Access 👉 What is the Join Form?
- Properties > Profile: in case you have the Attendees module - Explore- 👉 What’s the Profile Tab in the Properties Module?
- Properties > Edit Profile: in case you have the Profile module - Edit Profile- 👉 What’s the Edit Profile Tab in the Properties Module?
7. Fill in the content of the modules you have activated (steps 3 and 4), and that need content.
For example, Agenda, Speakers, Sponsors, etc.

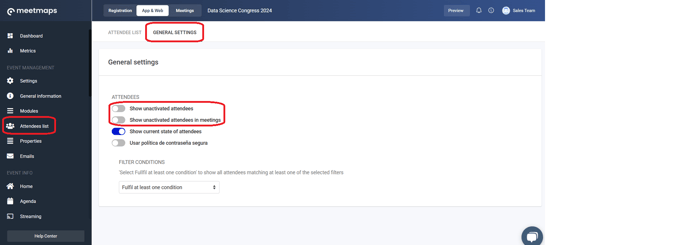
- Show unactivated attendees: Combine this with the automatic email "When receiving a chat message" (and add the link to access the Web), and you’ve got a winning option! 🏆
- Show unactivated attendees in meetings: This is ideal if you only have 1-to-1 Meetings. Pairing this with automated meeting emails will also encourage its use.
Give attendees access to the Web
8. Via email - Campaign sends registered attendees 🍋 the username, password and the link to the Web.
👉 How to create the access credentials email for an event?
👉 What status can an attendee have?
NOTE 🗒️: Registered attendees have been previously added to the Attendee List in one of the following ways:
- Registration form.
+ info 👉 How to create a registration form? - Registration form with ticket sales.
+ info 👉 How does the Tickets section work? - Massive import of attendees through CSV (Excel/spreadsheet).
+ info 👉 How can I import and/or edit attendees in bulk? - Manual registration of attendees (one by one).
+ info 👉 How to manually register an attendee?
TIP 💡After a few days, send a second email to those attendees (registered 🍋) who have not yet become activated users 🍏
Encourage the use of the Web
9. You can encourage the use of the Web through:
- Emails to registered attendees 🍋 explaining everything they can do if they access the Web
- If it is an in-person event 🙋:
- hang posters with the link to the Web
- the staff in charge of controlling the access to the event can inform the attendees about the Web and how to access it
NOTE 🗒️: you may be interested in these other articles:
👉 How to set up the landing page?
-1.png?height=120&name=BLAU__EMBLEMA%20PRINCIPAL%20SENSE%20ESLOGAN%20(1)-1.png)