Available for licenses:
![]() Event App Starter, Pro, Enterprise *
Event App Starter, Pro, Enterprise *
![]() Virtual Venue Starter, Pro, Enterprise *
Virtual Venue Starter, Pro, Enterprise *
![]() Suite Starter, Pro, Enterprise *
Suite Starter, Pro, Enterprise *
* Workshop-style agenda sessions on Enterprise licenses only
What is the Agenda section?
The Agenda section is where you upload the event program📆 and session information, as well as other settings.
There are 5 tabs in this section
1. Sessions
How to set up a session?
In App & Web > Agenda, click on "New Session +". Select the type of session you need to create:
- Standard session
- Workshop-type session
+ info👉 What are Workshop agenda sessions?

A pop-up appears where you must fill in the following information:
1. Information for attendees:
- Session Title: Edit it in all your enabled languages.
- Location: This section is best suited for physical events; for virtual events, this section may not be relevant.
- Description: Additional information about the session. HTML is supported. Images and even HTML links can be added here.

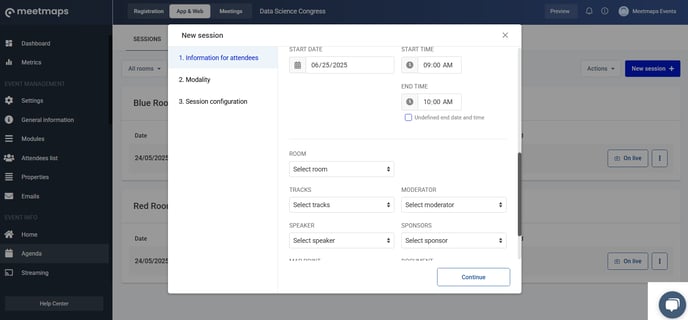
- Session Start Date
- Session start time
- Session end time: You can choose to have it undefined
- Room: If you have defined physical rooms in the section, you can assign the room in which the session takes place.👉 How to set up the agenda by rooms
- Tracks: The drop-down menu shows the existing tracks
- Moderator: Choose the moderator from the drop-down list of speakers.
- Speaker: You can select multiple speakers👉 What is the speakers section?
- Sponsors: Select the sponsoring company from the drop-down menu👉 What is the Sponsors section?
- Map point: If you have defined virtual spaces, you can add them to the session. 👉What are virtual spaces?
- Document: Attach a .pdf file with information, for example, about the session. The accepted formats are pdf, jpg, and png, and the current maximum size for a document is 6MB.
IMPORTANT ❗In the Landing only this information appears: title, date, times, location, description, tracks, speakers, and sponsors depending on the layout chosen.
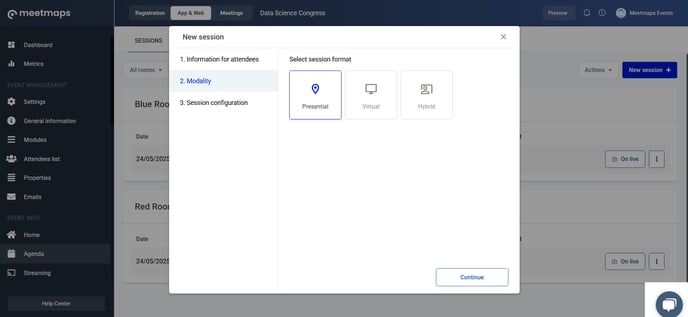
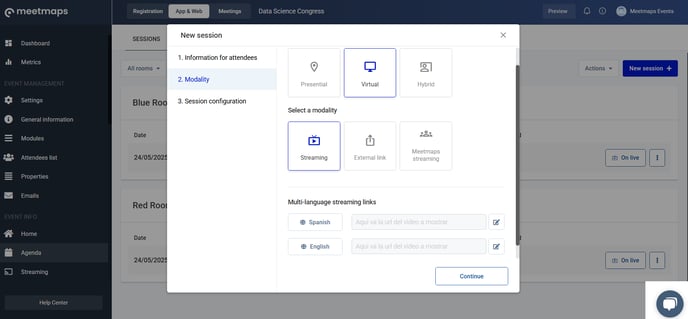
3. Session Configuration

- Itineraries: Make this session visible only to a segment of attendees
👉How to segment the agenda session view according to attendee type? - Private Session for: Make this session visible only to a specific attendee
Assistant interaction
- Activate Questions & Answers
- Activate Polls on Live
- Activate group chat
- Activate reactions
+ info 👉 What interaction options are available during a presentation at an event?
NOTE 🗒️: If the sessions are workshop-type, you can also activate the following options:
- Registration options
- Allow registration from the event registration form
- Allow registration from the calendar (make it a paid session)
2. Tracks
Tracks are color-coded tags 🔵🔴that help differentiate the content of one agenda session from another. They can be assigned to agenda sessions to make it easier to search and filter presentations by topic. This tool makes it easier to quickly and visually find sessions on the agenda.
IMPORTANT ❗The tracks are available for the App & Web (not Landing).
- In Agenda > Tracks, click on "New Track" and assign a name and, optionally, a color. Both will be visible in the event agenda.

- Edit the agenda session you need, and in the Attendee Information > Tracks tab, choose the track you want. You can add multiple tracks.

NOTE🗒️: In Agenda > Settings you can activate the color of the tracks to be displayed in the App's agenda sessions

3. Rooms
The rooms are spaces where several sessions take place in a row, allowing attendees to stay in the same place, without having to enter and leave the sessions as the day's presentations progress.
In Agenda > Rooms, click the "Create Room" button. There, assign:
- A name for the room
- An image (optional field)
- A video (optional field)
- Determine the room's capacity, that is, the number of people who could enter the room (if no specific number is specified, capacity is unlimited).

IMPORTANT ❗Setting a video for the room is optional, however we recommend it because if you forget to activate the live session or the transmission fails, the attendees will see the video you have configured in each of the rooms by default. It is also useful for pause intervals between sessions.
It's important to include the link of the video in all the languages of the event. If in one of the sections it is not included, the attendees will not see the video.
Once you've created the different rooms, you'll need to link the agenda sessions to them. When creating or editing an agenda session, in the 1. Attendee Information section, select the room.

When you have rooms, the ideal agenda layout is the "complete agenda" in Agenda > Configuration. This layout offers the ability to create rooms and the possibility of having two or more simultaneous sessions broadcasting in the same time slot.
+ info 👉 What type of agenda to configure depending on the characteristics of the event?

NOTE 🗒️: If your event has streaming by rooms👉 How is the live Streaming managed in the Agenda by Rooms?
4. Settings 🛠️
Agenda Configuration

- Allow attendees to rate sessions
- Show meetings in Agenda: you must have the Meetings 1to1 module activated. This will make confirmed meetings with other attendees and exhibitors visible.
- Hide hours of agenda in sessions
- Limit registration to multiple sessions in the same time slot: this applies to the registration of workshop sessions in the agenda, through the App or Web. Additionally, you can define the minimum and maximum number of sessions an attendee can sign up for during the entire event, and on a single day of the event.
- Event day duration: in the App, the sessions will be displayed according to the defined end time.
- Change the default name of the 'Room' and 'More info' buttons.
Display

- Navigation: Select between the Standard or Complete view of the agenda content.
- App Navigation📱: Select between Informative or Visual view for the agenda navigation in the App.
5. Participant Management
In this section, you can manage the attendees of workshop-type agenda sessions, if your license includes them.
 When you expand the session, you'll see the attendees registered for it. Clicking the three dots allows you to remove an attendee if you wish. The blue oval indicates the capacity.
 By clicking the action button, you can add one or more attendees.
 Attendees can be added individually:

Or you can add them by role:
 Once added, the capacity will increase to reflect the new attendees that were added.
