Available for these licences:
![]() Access Starter, Pro, Enterprise *
Access Starter, Pro, Enterprise *
![]() Event App Starter, Pro, Enterprise *
Event App Starter, Pro, Enterprise *
![]() Virtual Venue Starter, Pro, Enterprise *
Virtual Venue Starter, Pro, Enterprise *
![]() Suite Starter, Pro, Enterprise *
Suite Starter, Pro, Enterprise *
* Starter: 10 promotional codes
Pro: 100 promotional codes
Enterprise: Unlimited
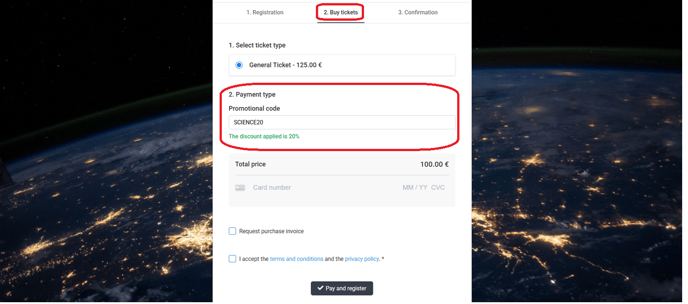
Meetmaps allows you to create promotional codes for event attendees to use when registering, allowing them to receive a percentage discount off the ticket price.
These codes only apply to tickets, not to workshop-type sessions or products.
Configuration
In Registration > Tickets, go to the Promotional Codes tab. You have two options:

1. Create a new promotional code
With Meetmaps, you can create promotional codes from scratch. To do this, click the "Create Code +" button, and a pop-up window will appear:
In this window, you need to fill out the following fields:
- Code Title: Internal name for the promotional code (not visible to attendees, for your reference).
- Promotional Code: The code attendees will input during registration.
- Ticket: If you have different ticket types, the code can be linked to a specific one.
- Discount: Percentage of discount the code will apply.
- Number of Uses: How many times the promotional code can be used.
- Switch "Activate Discount Code"
IMPORTANT ❗ If you set the number of uses to 0, it will have unlimited uses.
Once you've filled in all the fields, click the blue "Create Code" button.
2. Import promotional codes in bulk
If you plan to create many promotional codes, importing is a convenient option.
1. Click the "Import" button and click "Download template"
Two download options will appear: "Download in .xslx format" or "Download in .csv format" Choose the option that best suits your needs, keeping in mind that you'll need to upload it later in .csv UTC-8 format.
IMPORTANT ❗Do not alter the column order or modify header titles in the template. Fill out all columns for each code.

2. Once completed, save the document in UTC-8 .csv format to import it in step 2 "Upload file (.csv)".
Activating Codes
To see at a glance whether a code is active or not and to activate or deactivate it, just click on the ☑️ on the code.
If it's activated, it will appear in blue. If it's deactivated, it will appear white. To change the status, just click on it.
Additionally, if you need to edit the code's settings, you can click on the ⚙️ on the code in question and edit the fields.
IMPORTANT❗ Always create distinct codes, even if they are linked to different ticket types of tickets.
To know more about it: How does the Tickets section work?
How it is displayed in the registration form