Available for these licenses:
![]() Access Enterprise
Access Enterprise
![]() Suite Enterprise
Suite Enterprise
When attendees complete the registration form where they purchase tickets to attend your event, you can offer them the option to receive an invoice for their purchase.
NOTE 🗒️But before moving forward, let's review useful configurations:
IMPORTANT ❗If the "Request invoice" buttons (both optional and mandatory) were not activated at the beginning of the registration phase, it is NOT POSSIBLE to generate invoices afterward. If the button is activated during the sales phase, the function is not retroactive. Invoices are only generated for registrations made after the invoicing switch is activated. Previous registrations cannot be invoiced.
Configuration
In Registration > Invoices > Settings there are 2 sections:
- General
- Bill issuer details
 General

- Allow requesting invoices when buying ticket: When purchasing the ticket, the attendee will have the option to request an invoice.
- Invoices must be requested: When purchasing the ticket, the attendee must request an invoice.
IMPORTANT ❗ the option of requesting an invoice during the registration does not have a retroactive effect. If you launch a registration form without this switch selected and later decide to activate it, only the bills of those new registrants who have clicked on the checkbox from that moment will receive the invoice.
Bill issuer details

Here, you will have to add the information of the bill issuer. Fields with an asterisk (*) are mandatory.
- Concept:
- Bill issuer name
- CIF
- Logo: optional. Square aspect ratio (e.g., 200 * 200 px).
- Address
- Postal code
- City
- Mail: this email will appear on the bill, and it will serve as the contact option for possible billing doubts
- Bill prefix: you can choose a generic enumeration, like 001- or 034, or initials
Email to send the invoice
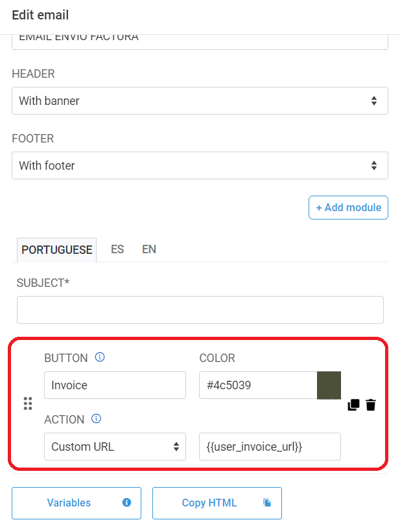
In Emails > Email automation go to the email actions. Find the email action of "When sending invoice". Click on the three dots > customize.


When you finish editing the template, click on "edit email". This automatically assigns the template to this email action.

NOTE 🗒️: It is also possible to create/edit the template and manually put a button with the variable { {user_invoice_url} } (without space between brackets).

IMPORTANT❗
- This email is the same for sending the initial purchase invoice and the corrective invoice (when making a 100% refund).
- The language of the invoices sent (in PDF format) is always in English.
How the attendee requests the invoice in the registration form
In the Registration form > buy tickets
 By selecting the "Request purchase invoice" the fields to be filled out will appear.

NOTE 📃:One person can purchase tickets for various colleagues. Each registration form must use the individual email of each colleague. However, the invoice can be issued with the name of the company if in this section they indicate the company's data.
Operational
Phase 1: registration with ticket purchase and automated invoice creation
Once the registration is complete, in invoices > invoices the purchase is registered and an invoice is created with a " Generated" status.

Phase 2: invoices sending
The invoice can be sent individually by clicking in the Email 📎icon or all at once if you click on "send invoices".
 You can also download the invoices individually with the download ⏬ button in .pdf format.

NOTE 📃: all bills disclose the 21% of VAT. Contact Meetmaps oifyou need to change this %.
Once sent, the invoices status will change from "Generated" to "Sent".

NOTE 🗒️: If you wish to do a return, contact Meetmaps because only our team members can issue one. You can find a return invoice in the invoices section.
+ info👉How to refund (return) a payment and how does it work?
Invoice design preview
The following segments appear:
- Invoice issuer information: logo, company name, administrative contact email, CIF, address, city, postal code
- Receiver information: CIF, name, email, address, postal code, city, province, country
- Invoice references: event, concept, bill number (with prefix), billing date
- References of attendee linked to the invoice: name and surname, email
- Description: type of ticket acquired, disclosure of the 21% of VAT.
- Products: If a product was purchased along with a ticket, this one will also appear in the invoice.
