-1.png?height=120&name=BLAU__EMBLEMA%20PRINCIPAL%20SENSE%20ESLOGAN%20(1)-1.png)
If you would like to allow attendees who are interested in meeting you and based on this information generate meetings for them in your calendar, this type of Matchmaking is the one you are looking for
Available for these licenses:
![]() Meetings Enterprise
Meetings Enterprise
![]() Suite Enterprise
Suite Enterprise
Meetings 1to1 with Preferences are an option for attendees to simply focus on selecting profiles of other attendees they find interesting, without worrying about finding available time slots to send meeting requests.
How to create Meetings 1to1 sessions with Preferences 👑?
The setup consists of 2 steps: creating the session and managing agenda publication.
PART 1: Creating the Meetings 1to1 Session with Preferences
1. In Meetings Dashboard > Summary of sessions click on the "Create session +" button and choose the "Matchmaking" option.
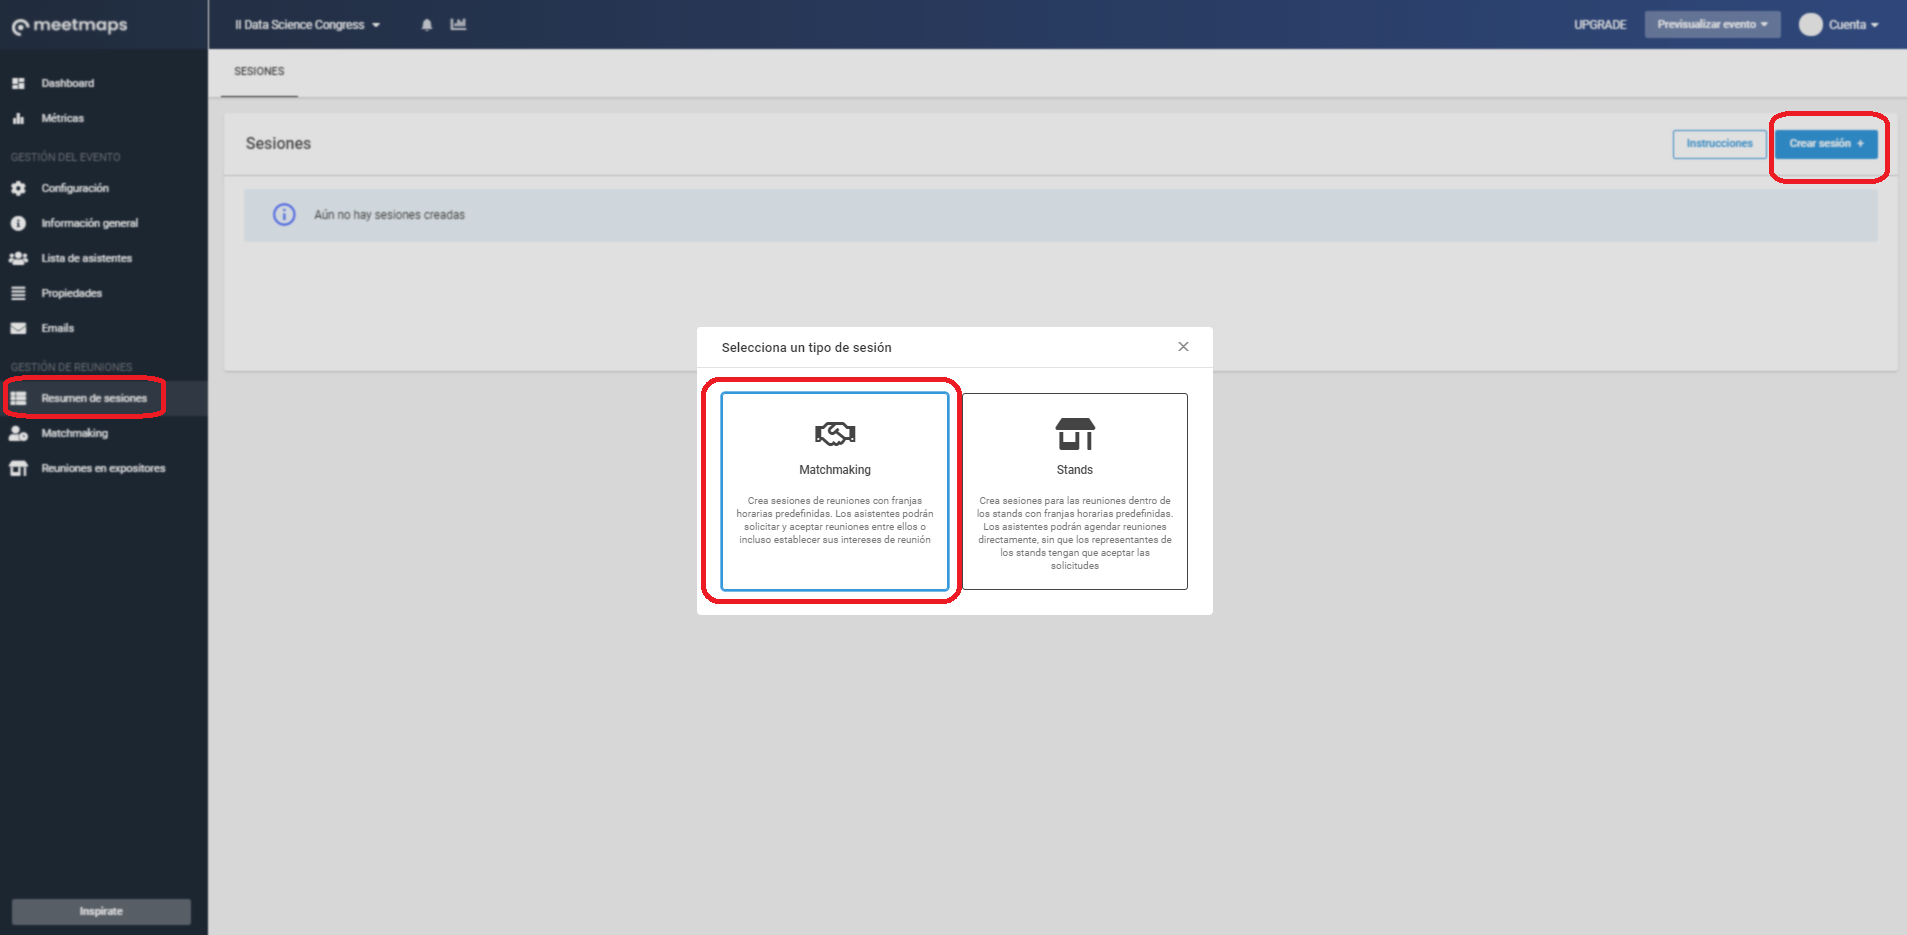
2. A pop-up will appear to complete the configuration fields, which are divided into 3 sections:
"Session Information" section:
- Name: Assign a name to the session. This name will be visible to attendees, so make it appealing 💁.
- Duration ⏰: Time duration for each meeting slot.
- Start date 📅: Date on which the Meetings 1to1 session of your event will take place. ❗There is no end date because you will need to create a separate session for each day of the event.
- Start time and end time: Time range during which the meetings will take place.
- Hosts: You can select one or multiple profiles from the dropdown menu. Only those roles will act as hosts for the meetings, meaning they will receive meeting requests. Alternatively, you can choose the preconfigured option "Everyone," in which case all registered attendees can act as hosts.
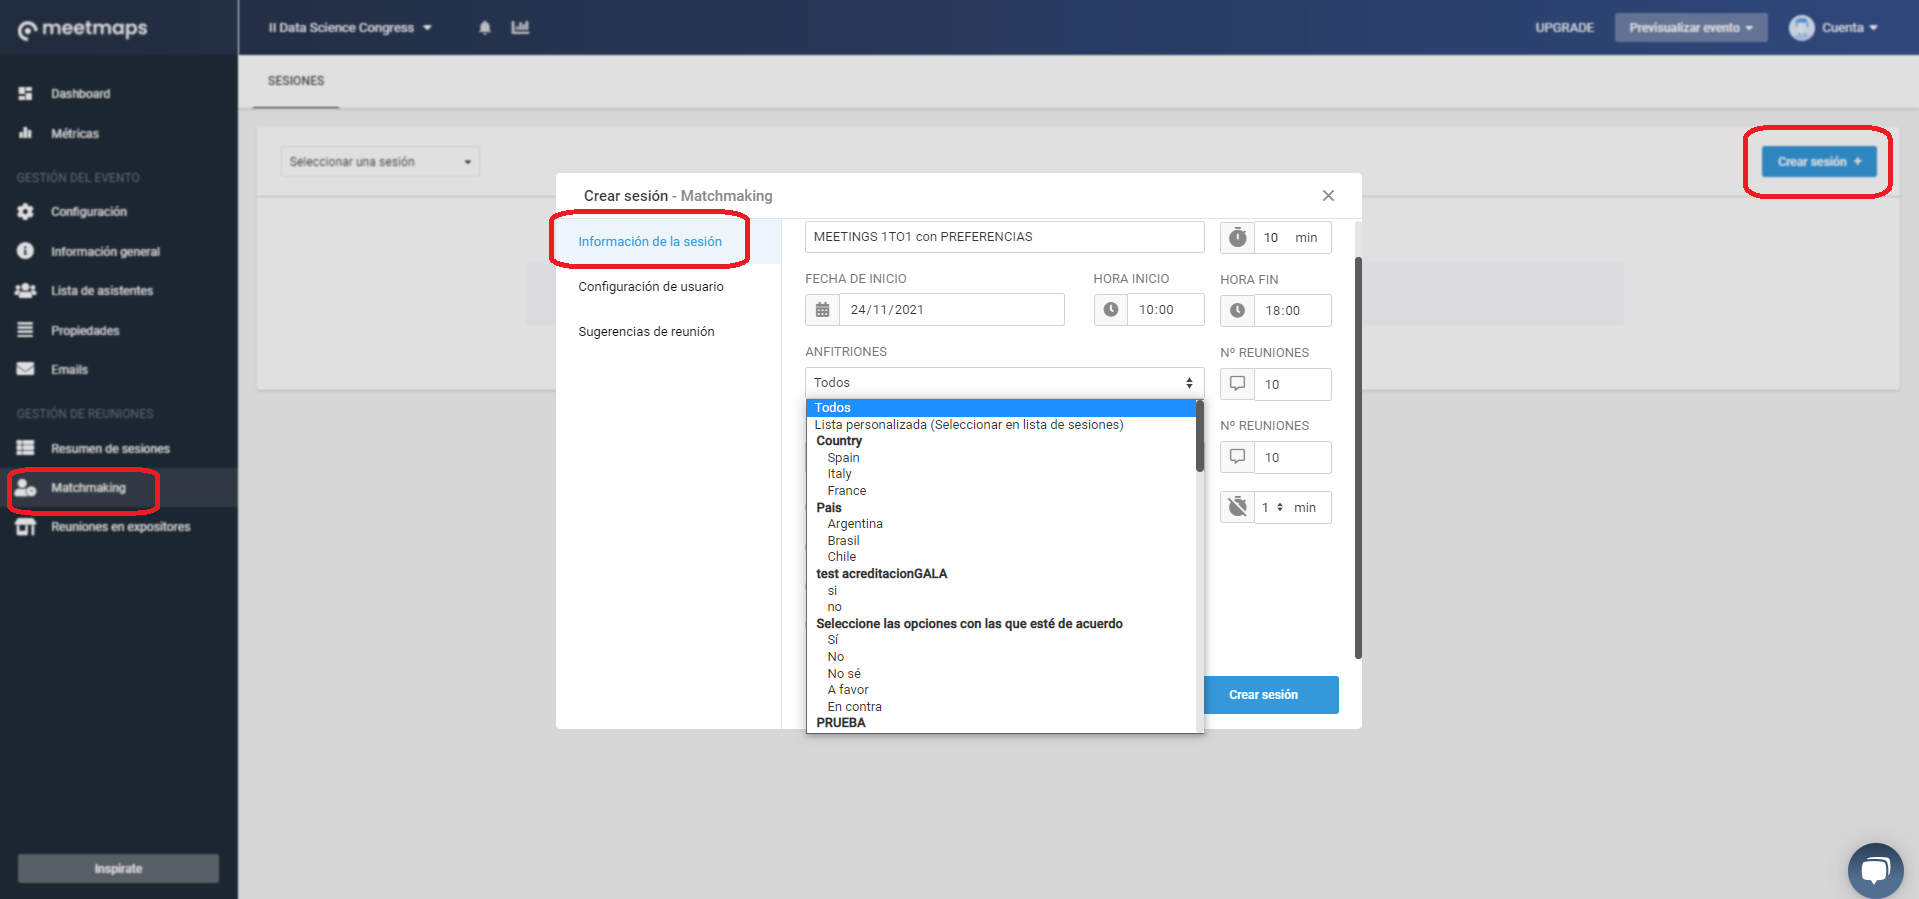
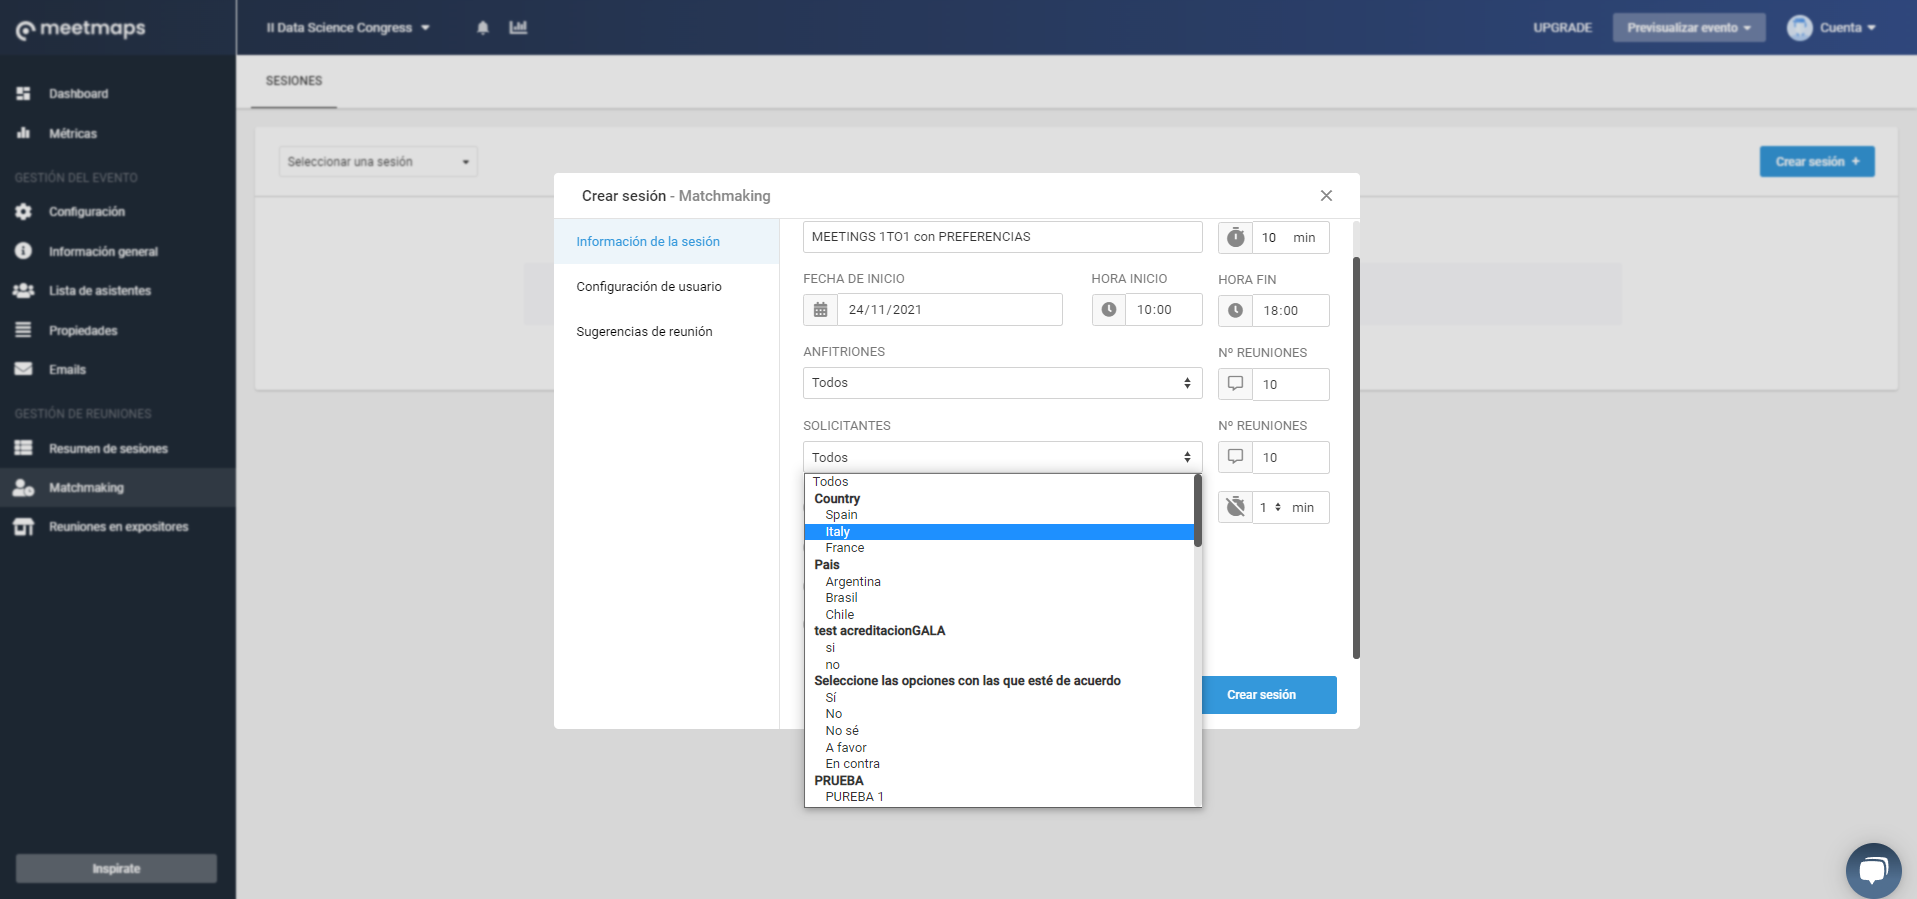
- Requesters: Here, you should also select one or more roles that will have the ability to request meetings with the host role configured in the previous step, or choose the preconfigured option "Everyone" to allow all attendees to request meetings.
-
Number of meetings 🔢: Specify the maximum number of meetings you want to allow for attendees during this Meetings 1to1 session with Preferences 👑. It should be related to the start and end times and the duration of the meeting slots.
-
Break time between meetings ⏳: You can enable the option for a few minutes of break time between meetings. Activate the switch and indicate the time.
-
Video call meetings: For online or hybrid events 💻, you need to enable this option. For in-person events, it is not necessary.
-
Meeting preferences: Activate the switch to enable the preference request feature in the session. This activation is essential to create the session with preferences
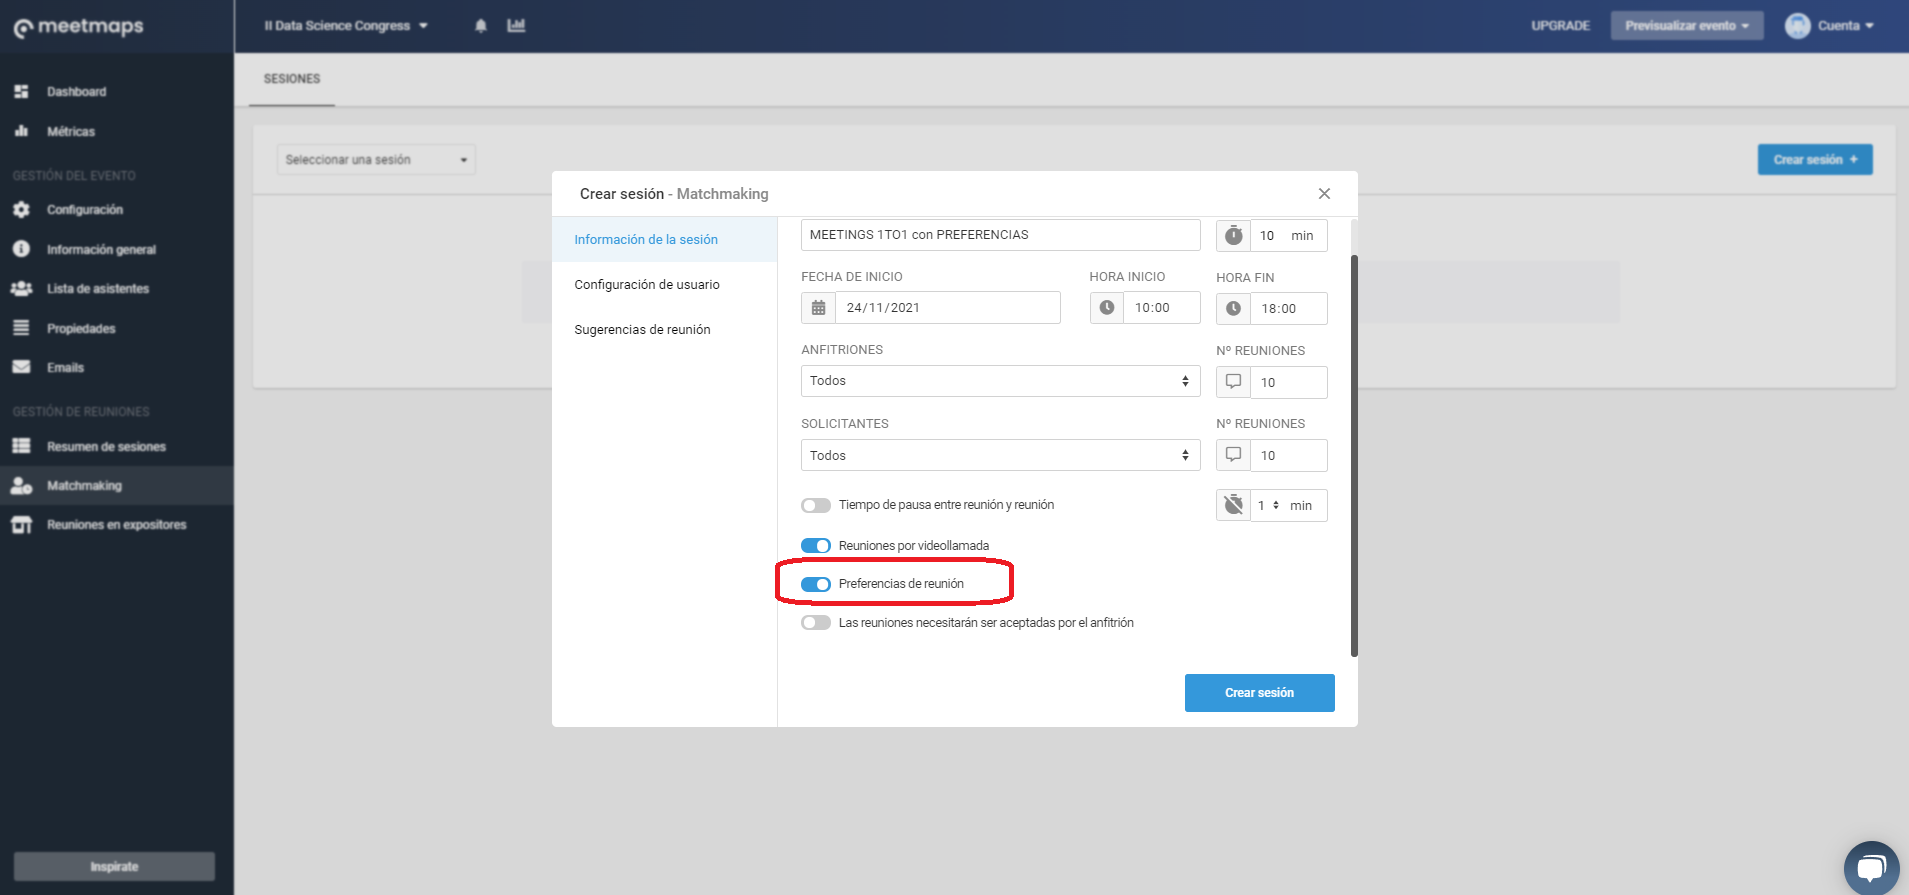
- Meetings need to be accepted by the host 🛡️: If you activate this option, meeting requests will need to be explicitly accepted by the hosts to be confirmed.
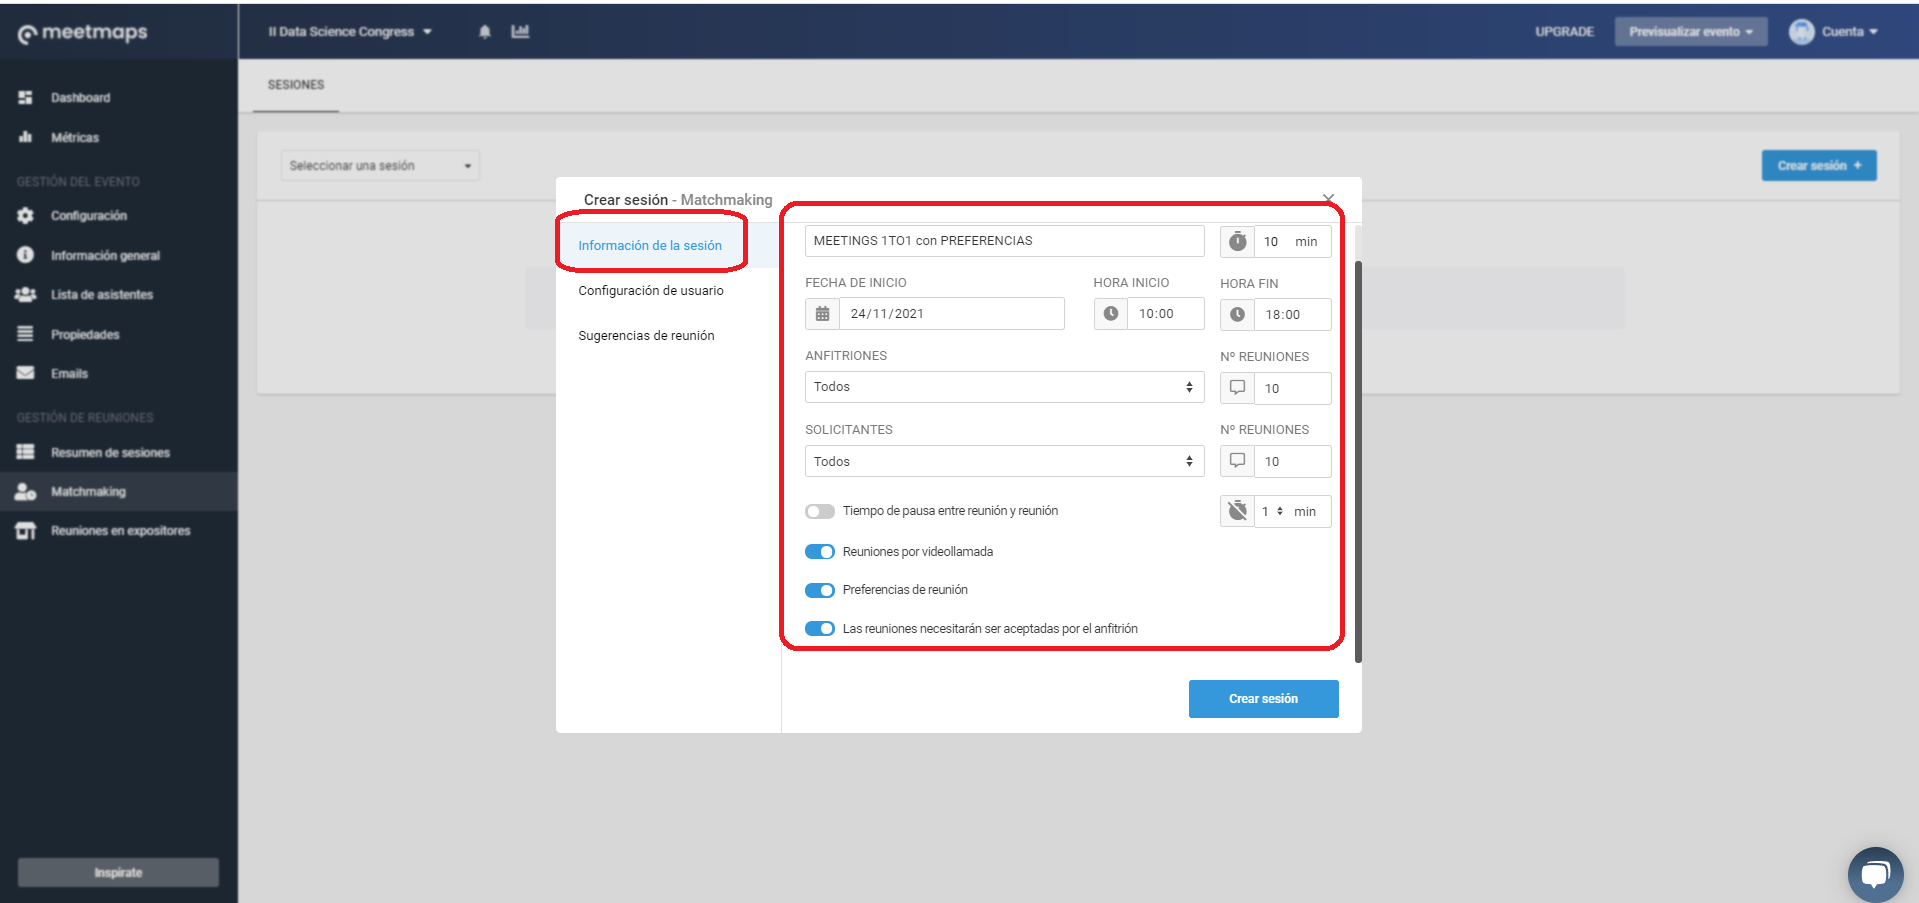
IMPORTANT❗The date, start and end time, hosts and requesters can't be modified once the meeting session has been created.
"User Configuration" section:
Here, you will activate tabs that attendees will see within the session in the event, allowing them to manage their meetings.

- Activate the "Request Meetings" section 💐: In this section, users can view the profiles of all attendees and send meeting interest requests.
- Activate the "My Requests" section 🎁 so that users can see which profiles have shown interest in them, allowing them to identify mutual meeting interests, giving more priority to those requests when generating the meeting agenda.
- Activate the "My Meeting Agenda" section 📋: Here, attendees can not only view confirmed meetings but also access them on the scheduled day and time.
- Allow attendees to block time slots 📵: This functionality allows attendees to block certain time slots to prevent meeting requests during those times.
NOTE 🗒️: To recommend certain profiles to attendees, set up the "Meeting Suggestions" section.
3. Finally, you'll need to click the "Create session" button, and it will appear in the "Meeting Summary" section. Here, you can edit some session ⚙️ settings, assign tables to hosts (only useful in physical events), delete 🗑️ the session, and reorder it among other sessions using the "six dots" button on the left (it's a drag-and-drop🔃 button).
You now have your first MEETING 1TO1 session with PREFERENCES 👑 for the event created, but wait, there's a little more to do. Let's move on to the second part 💪.
PART 2: Management of agenda publication
In this second part, you can:
- View the marked interests.
- Have Meetmaps' Event Management Software automatically generate a meeting agenda proposal for attendees.
- Make the necessary modifications, validate it, and publish the agenda to attendees at the appropriate time.
How to view the interests marked by attendees?
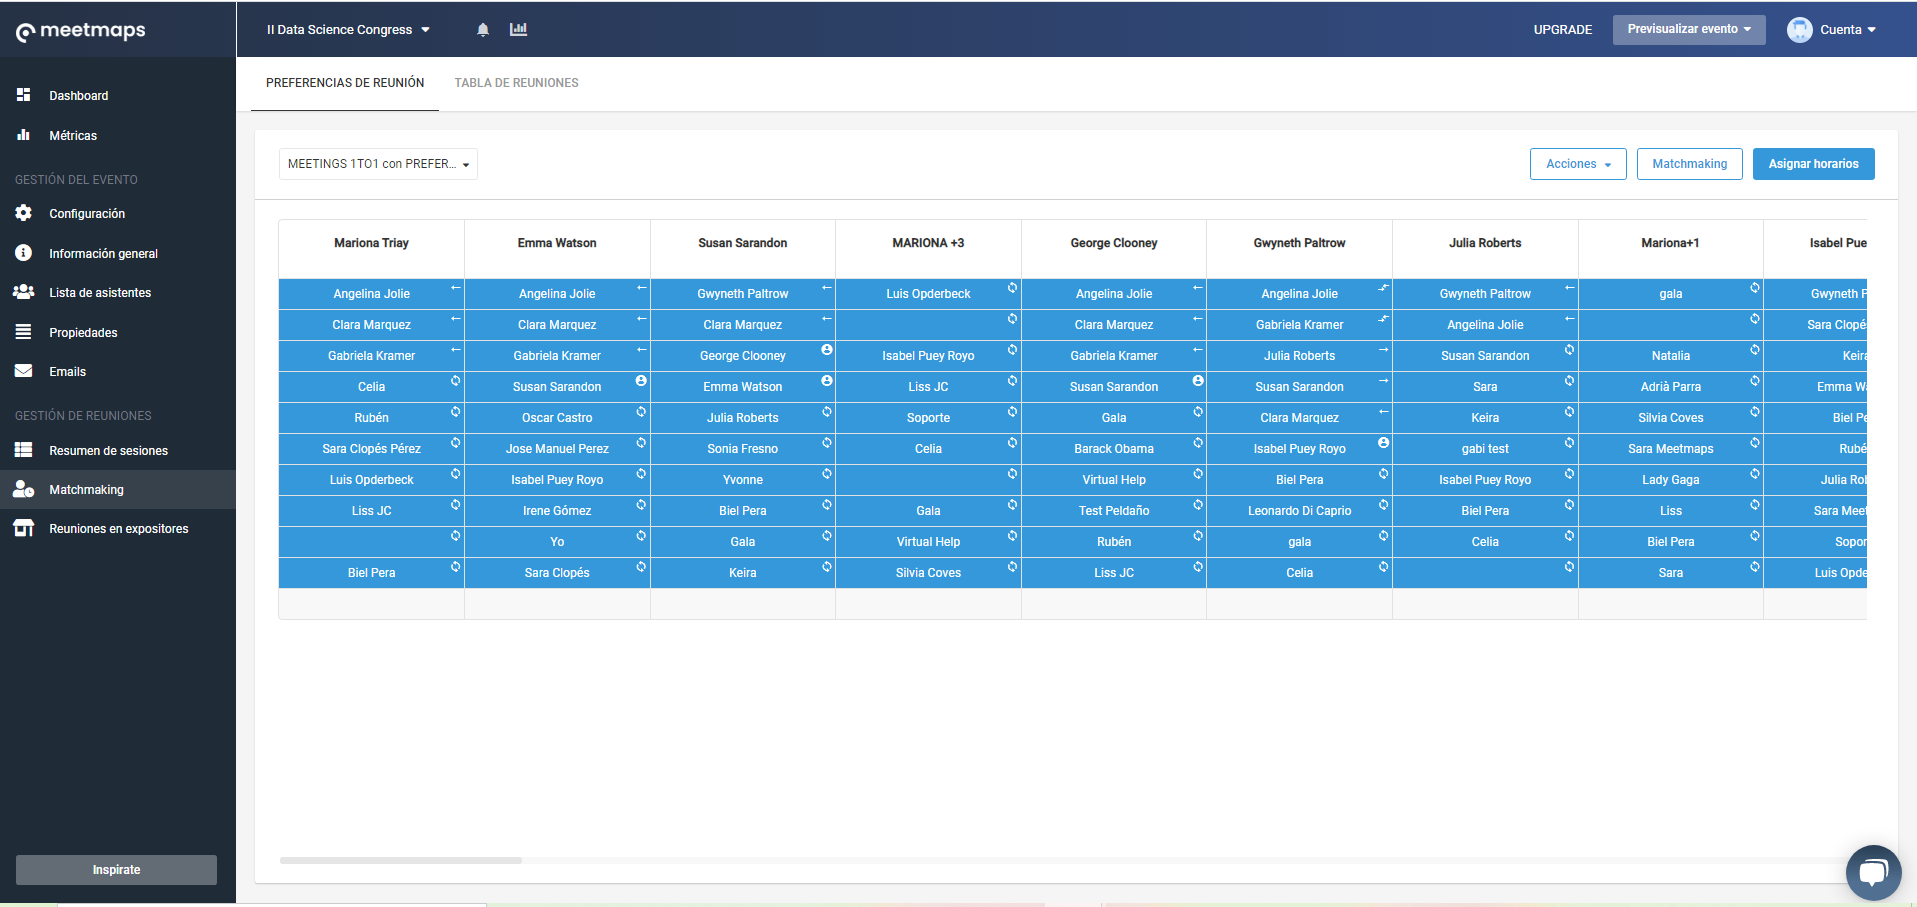
As attendees select interests in the Meetings 1to1 session with preferences you created, you will see their choices in the Matchmaking section of the side menu, under the "Meeting Preferences" tab.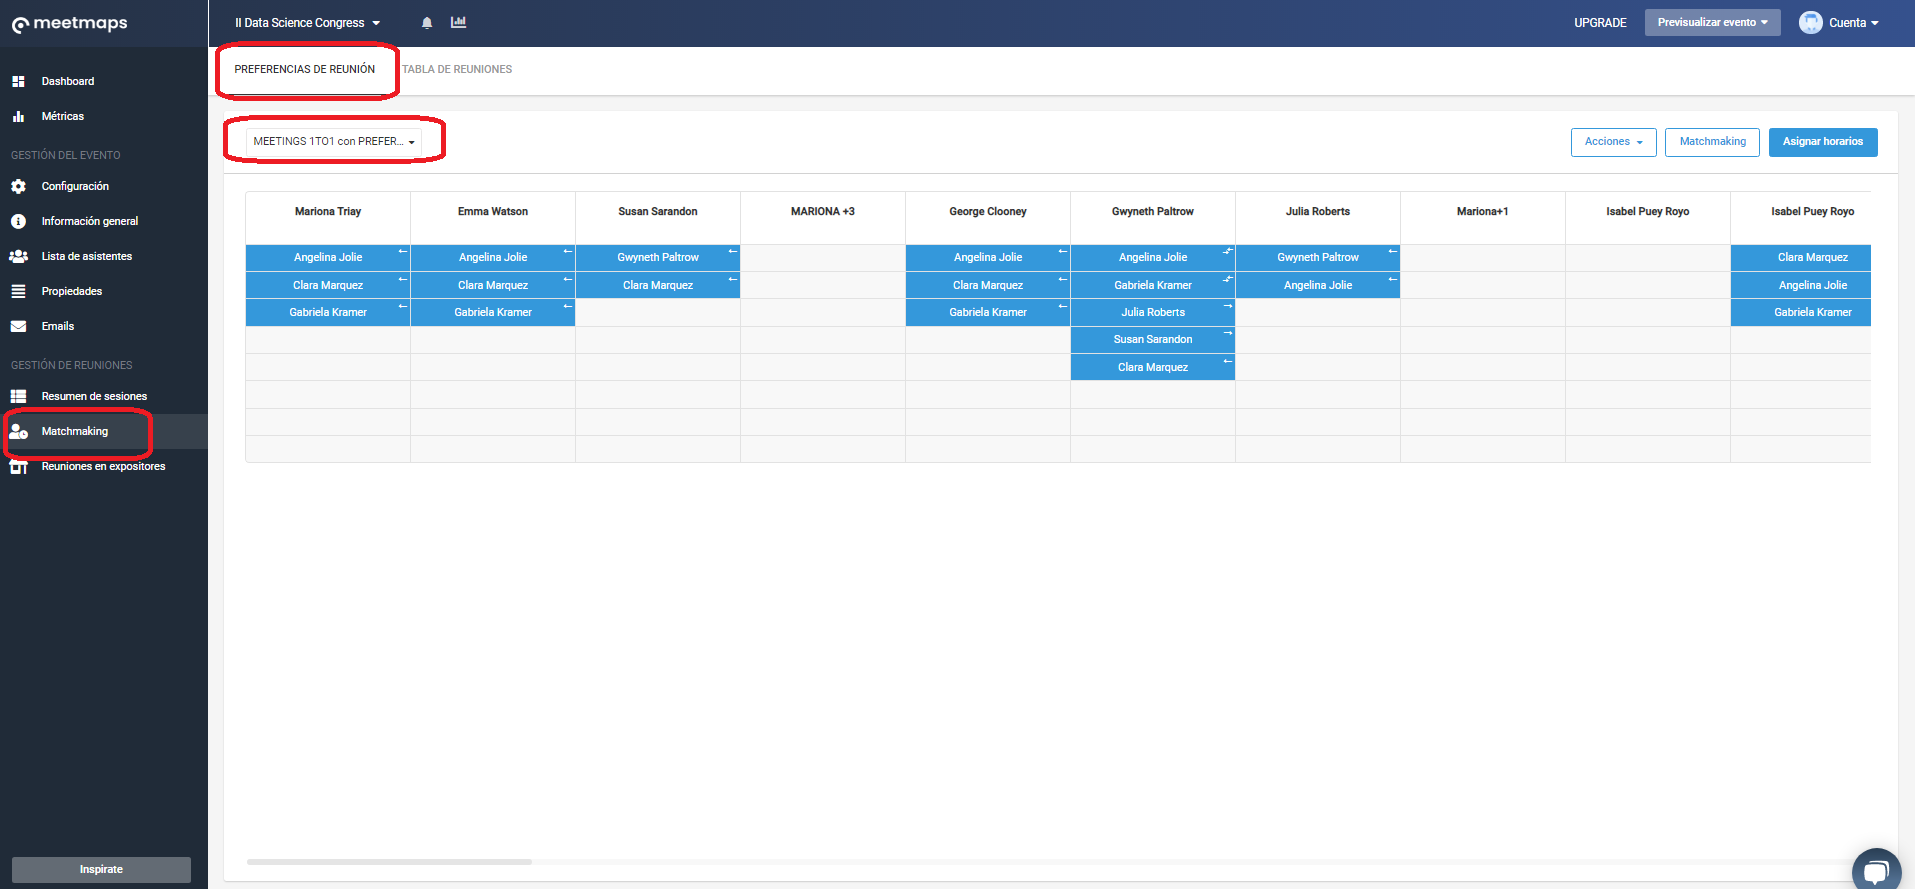
It's important to note that the table should be read from the host's point of view (the one leading the preferences table), and their column will display as many cells as the number of meetings configured when creating the session in the previous step. For example, if you have configured 8 meetings, there will be 8 cells, and you should be able to generate 8 meetings.
How to do it? The first step is to identify the 4 types of preferences and understand how to distinguish them based on the symbols in the cell:
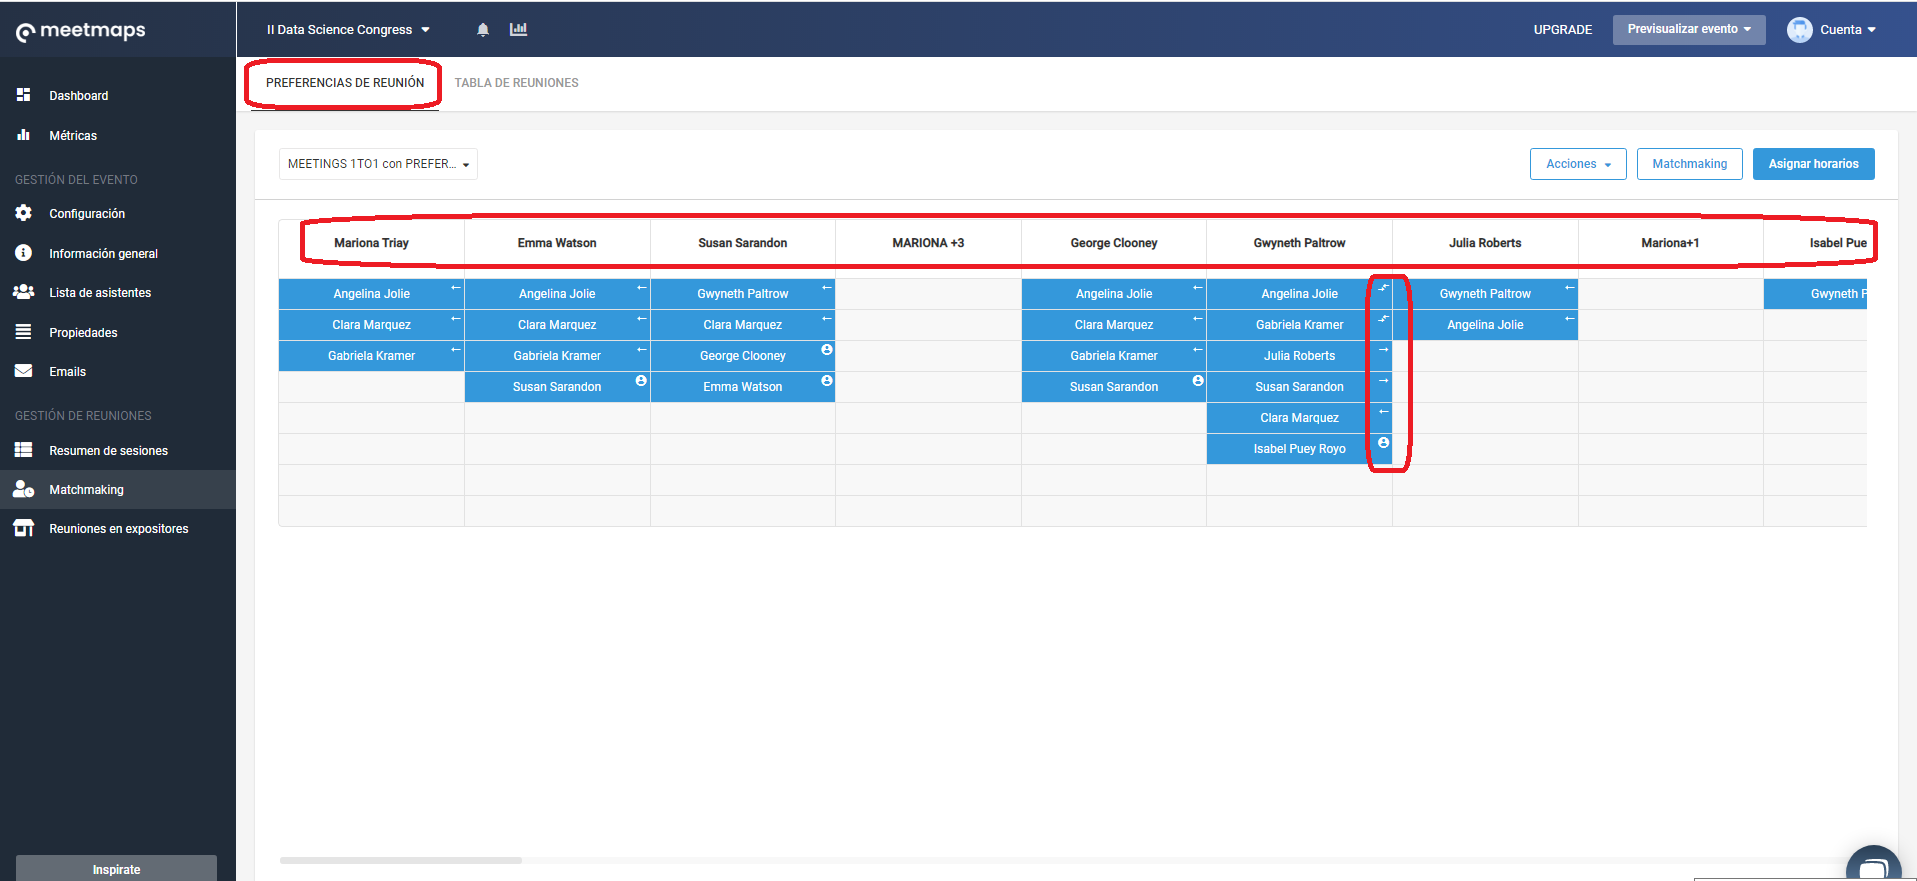
- Match 🔃: When both attendees have indicated an interest in meeting each other. They always appear at the top because they are of a higher level and will be prioritized.
- Requested by the host ➡️: These are the meeting preferences marked by the attendee leading the column but not matched by the other attendee.
- Requested by the other attendee ⬅️: These are the meeting preferences marked by the other attendee, not by the host leading the column, so there is no match.
- Created by the organizer 👤: As the event organizer, you can also mark a meeting preference for the host leading the column because you may be aware that two people would be interested in meeting each other even if they haven't marked it themselves.
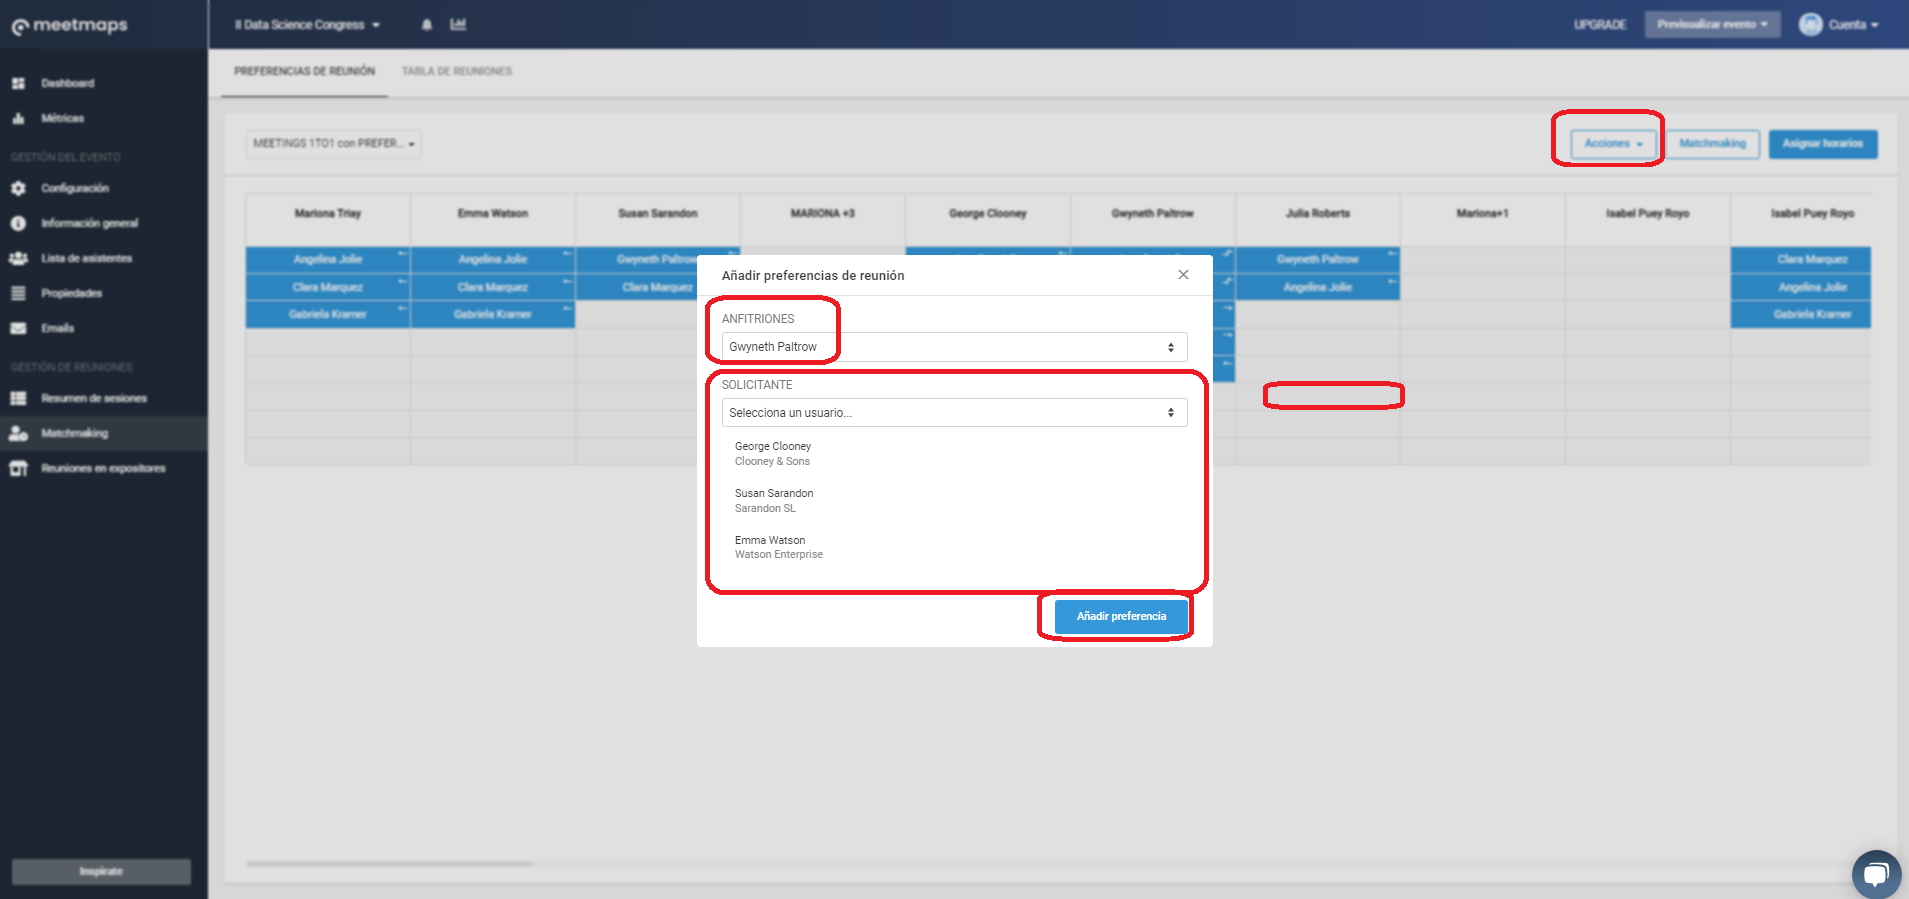
To mark meetings as an organizer, you can click on the Actions button that appears in the upper right corner and click on the option Add Meeting Preferences. You can also do it directly by clicking on an empty slot in the table. Both steps will generate the same pop-up window where you can select the Host (only one) and the Requesters (multiple) from the dropdown menu.
Once you have manually added the meetings and it's the date you have communicated to the attendees to mark their interests, you will click on the upper right button of Matchmaking >> Accept... and the magic will happen ✨.
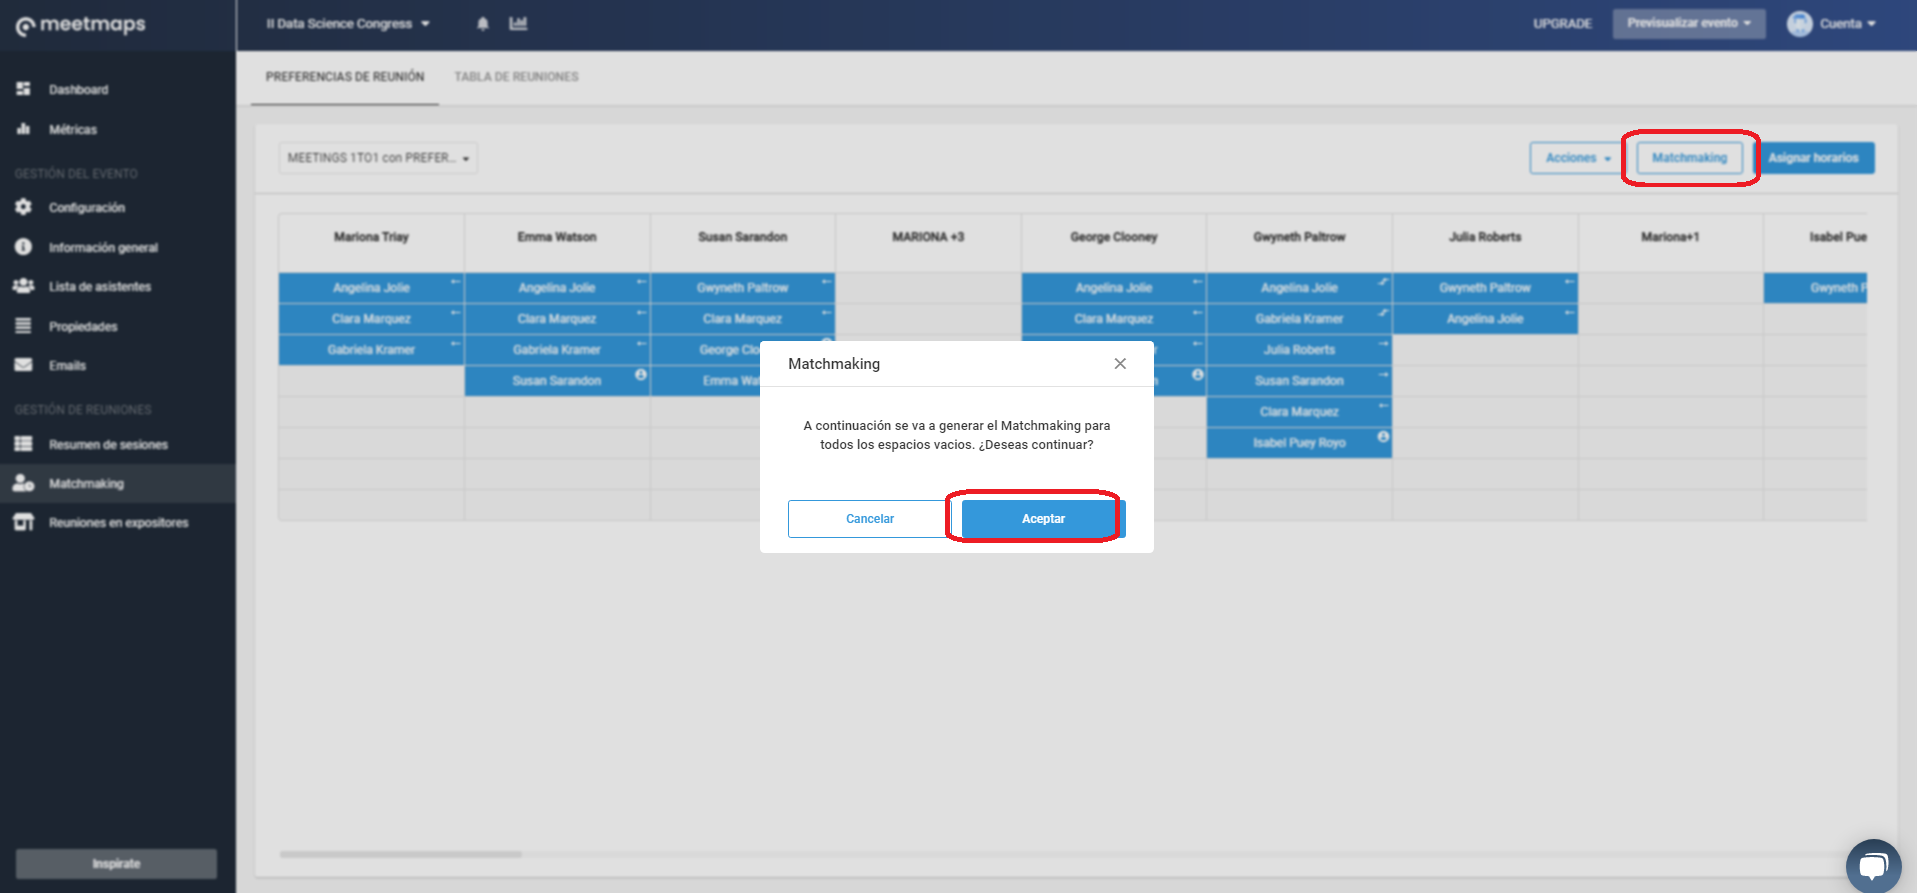
What does this Matchmaking action imply? Basically, it will fill in the empty slots in the previous table of meeting interests and create meeting proposals randomly. You can distinguish them because they will have the symbol 🔄, and if you hover over them, you will see "created randomly".
What happens next? You will see a proposal of meetings for the attendees:
IMPORTANT❗ This view provides an overview of who is meeting with whom based on information entered by the users themselves, the organizer, or the system. It is not yet a meeting agenda, nor is it published.
If you need to delete any of the meetings proposed through matchmaking, click on the meeting, and you will find the option to do so.
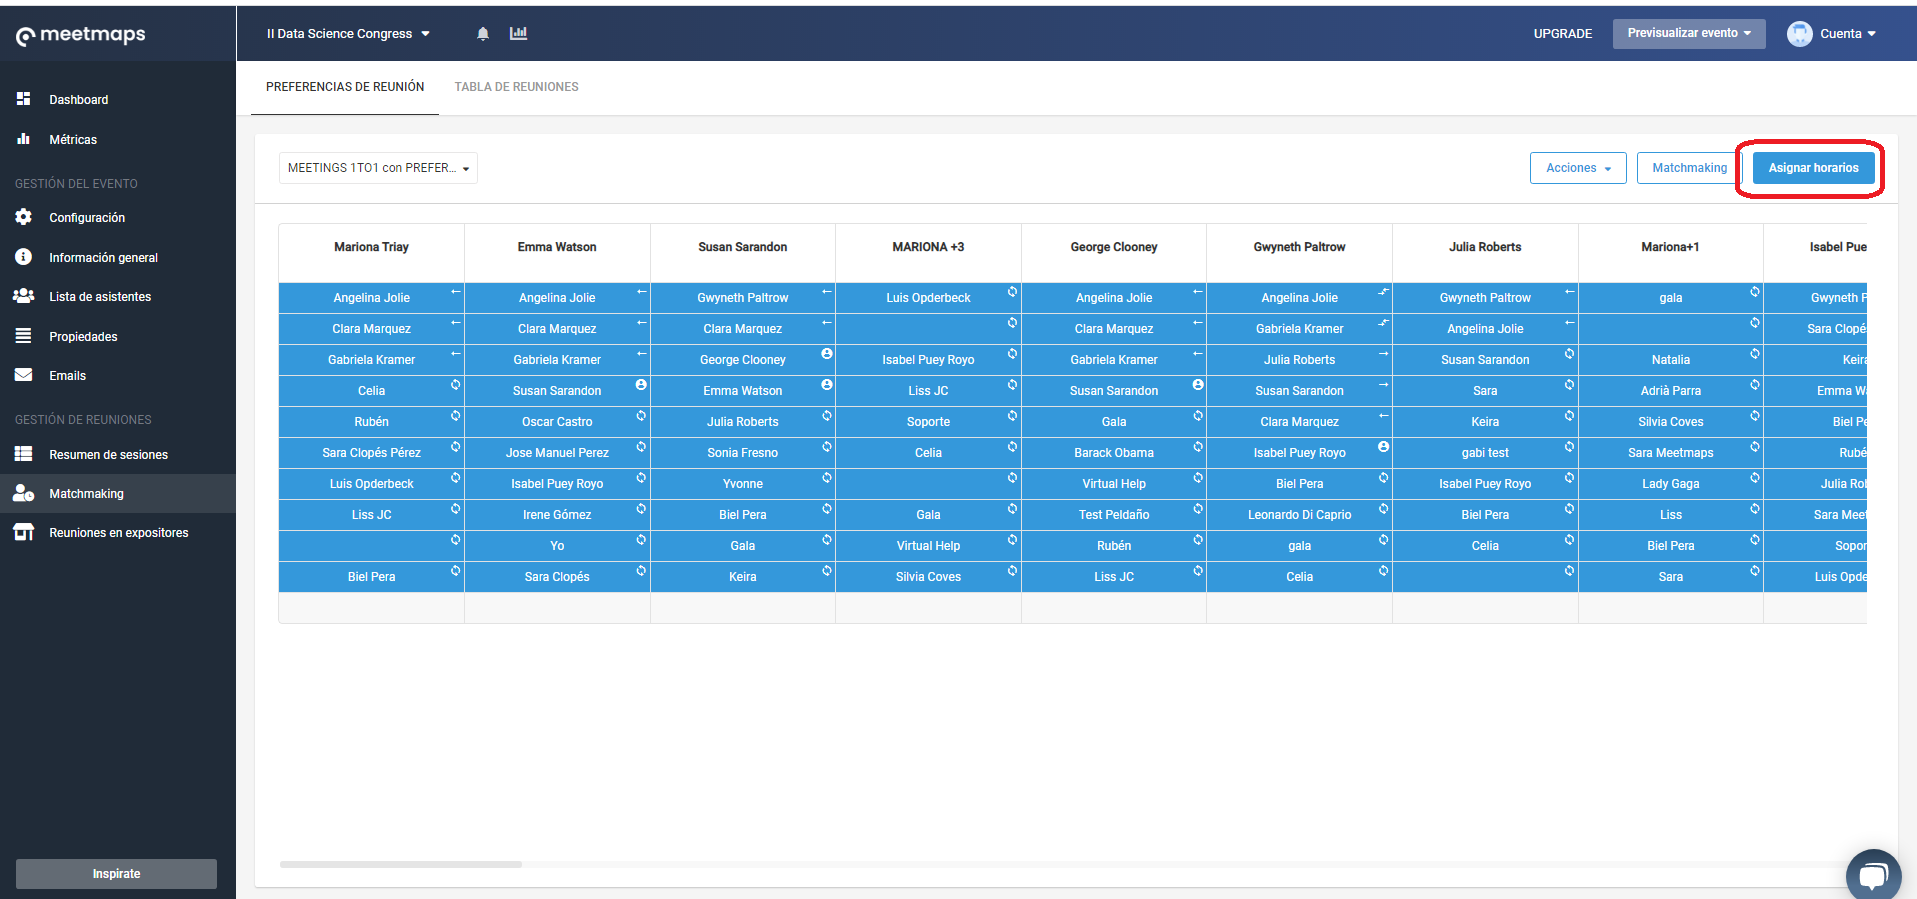
And now? When you have reviewed that everything is correct, it's time to: ASSIGN TIME SLOTS to generate the agenda for each attendee. To do this, click on the blue "Assign Time Slots" button at the top, and you will need to click on the Assign Time Slots button again in the pop-up window.
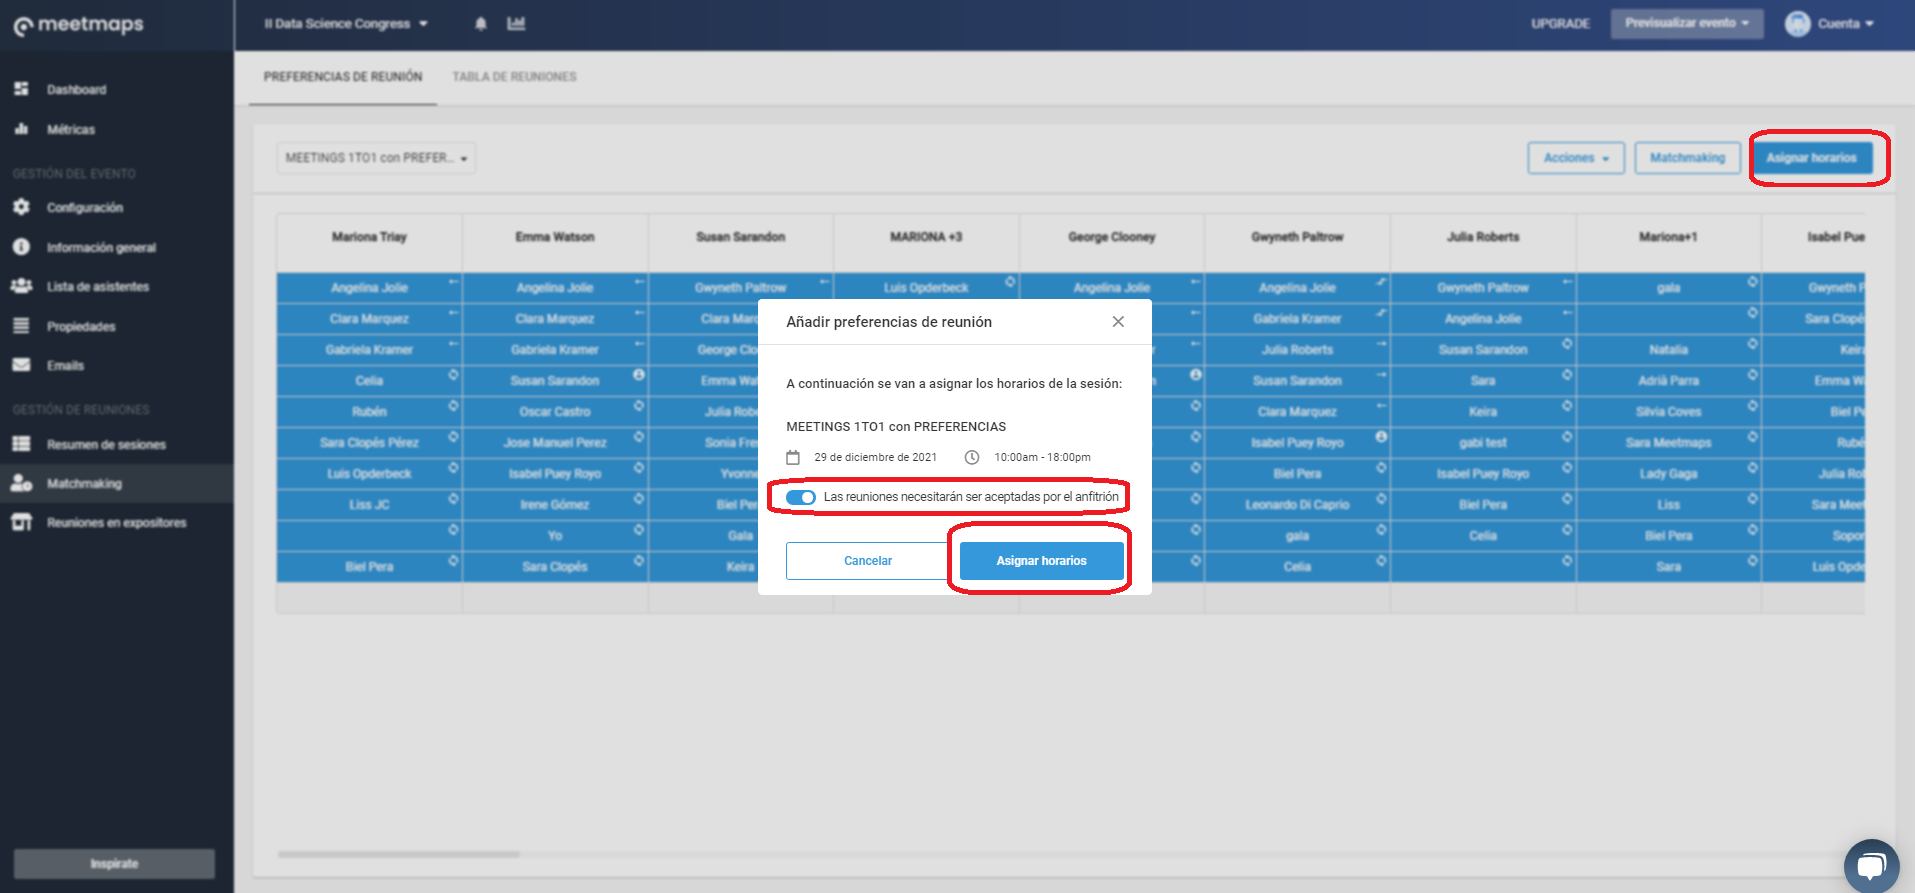
NOTE🗒️: You can choose for this agenda not to be final and make the hosts accept or reject the meeting. It's not about imposing but proposing meetings that are of interest to both parties 👌. If you don't activate the switch, it will be an agenda with closed meetings.
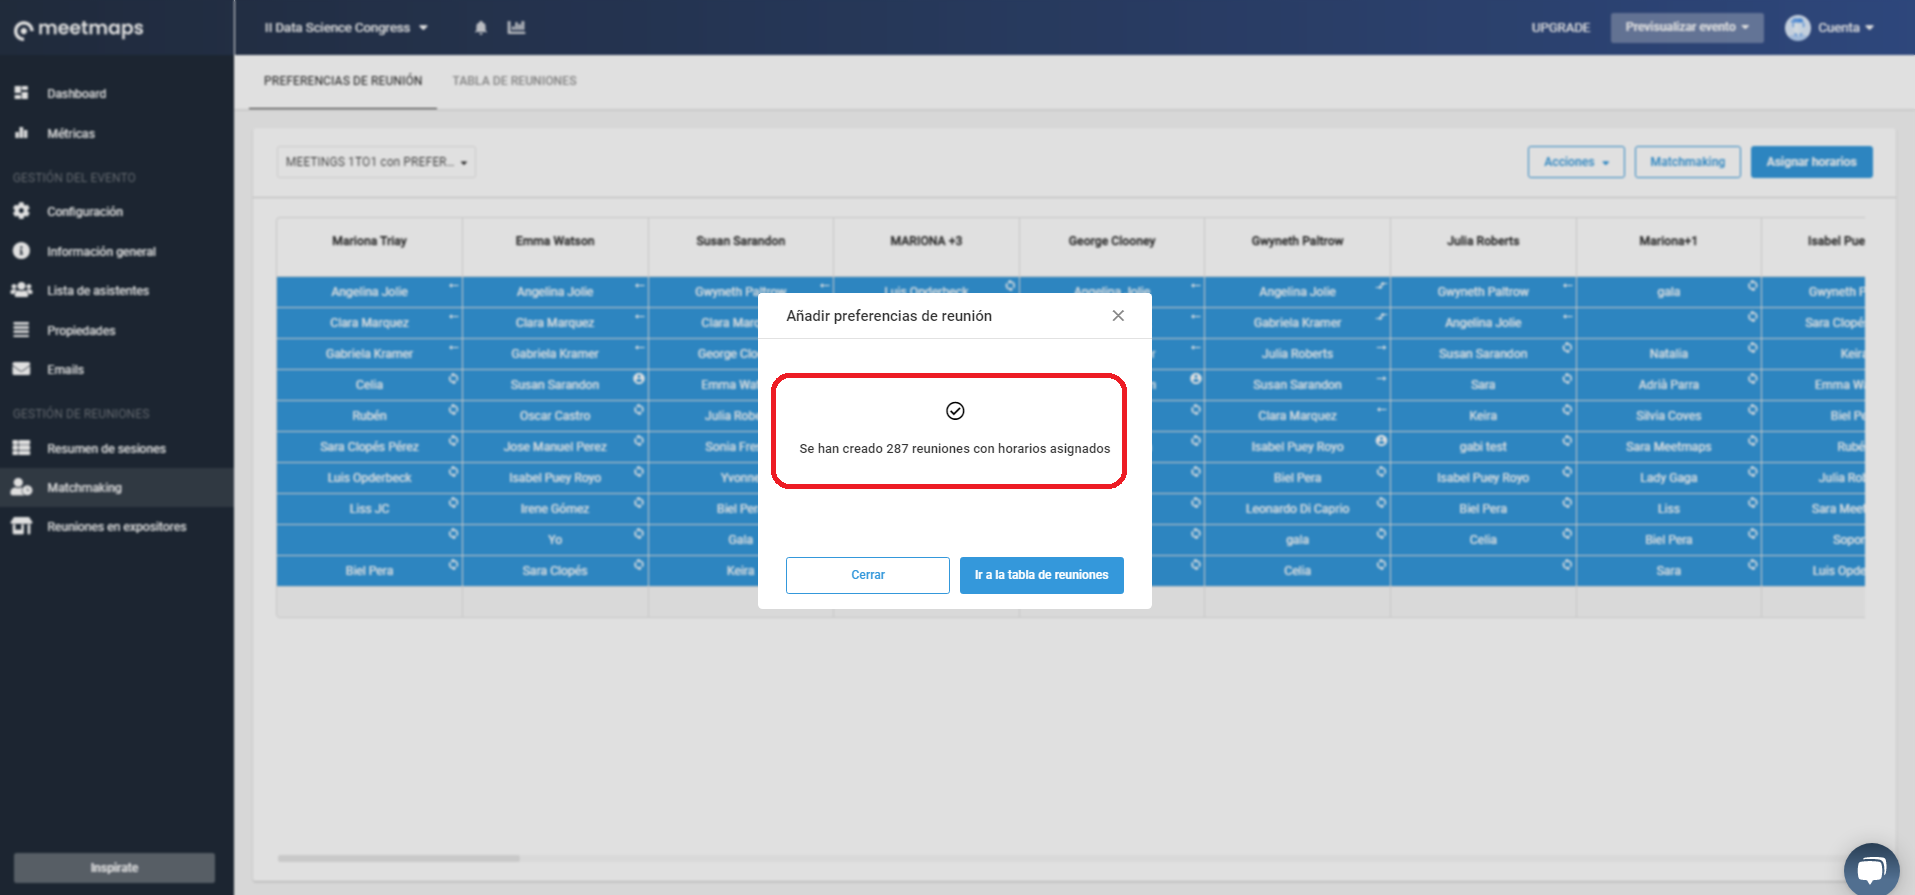
By clicking on "Assign Time Slots" the meetings will be created in the available time slots, and you will be confirmed with the total number of meetings with generated schedules. It's almost ready.
TIP 💡: In the MEETINGS TABLE tab, you can choose the view that best facilitates the reading of the meetings table. Therefore, you can choose how to visualize the hosts (column headers): by person's name, by organization's name, or by person and organization. 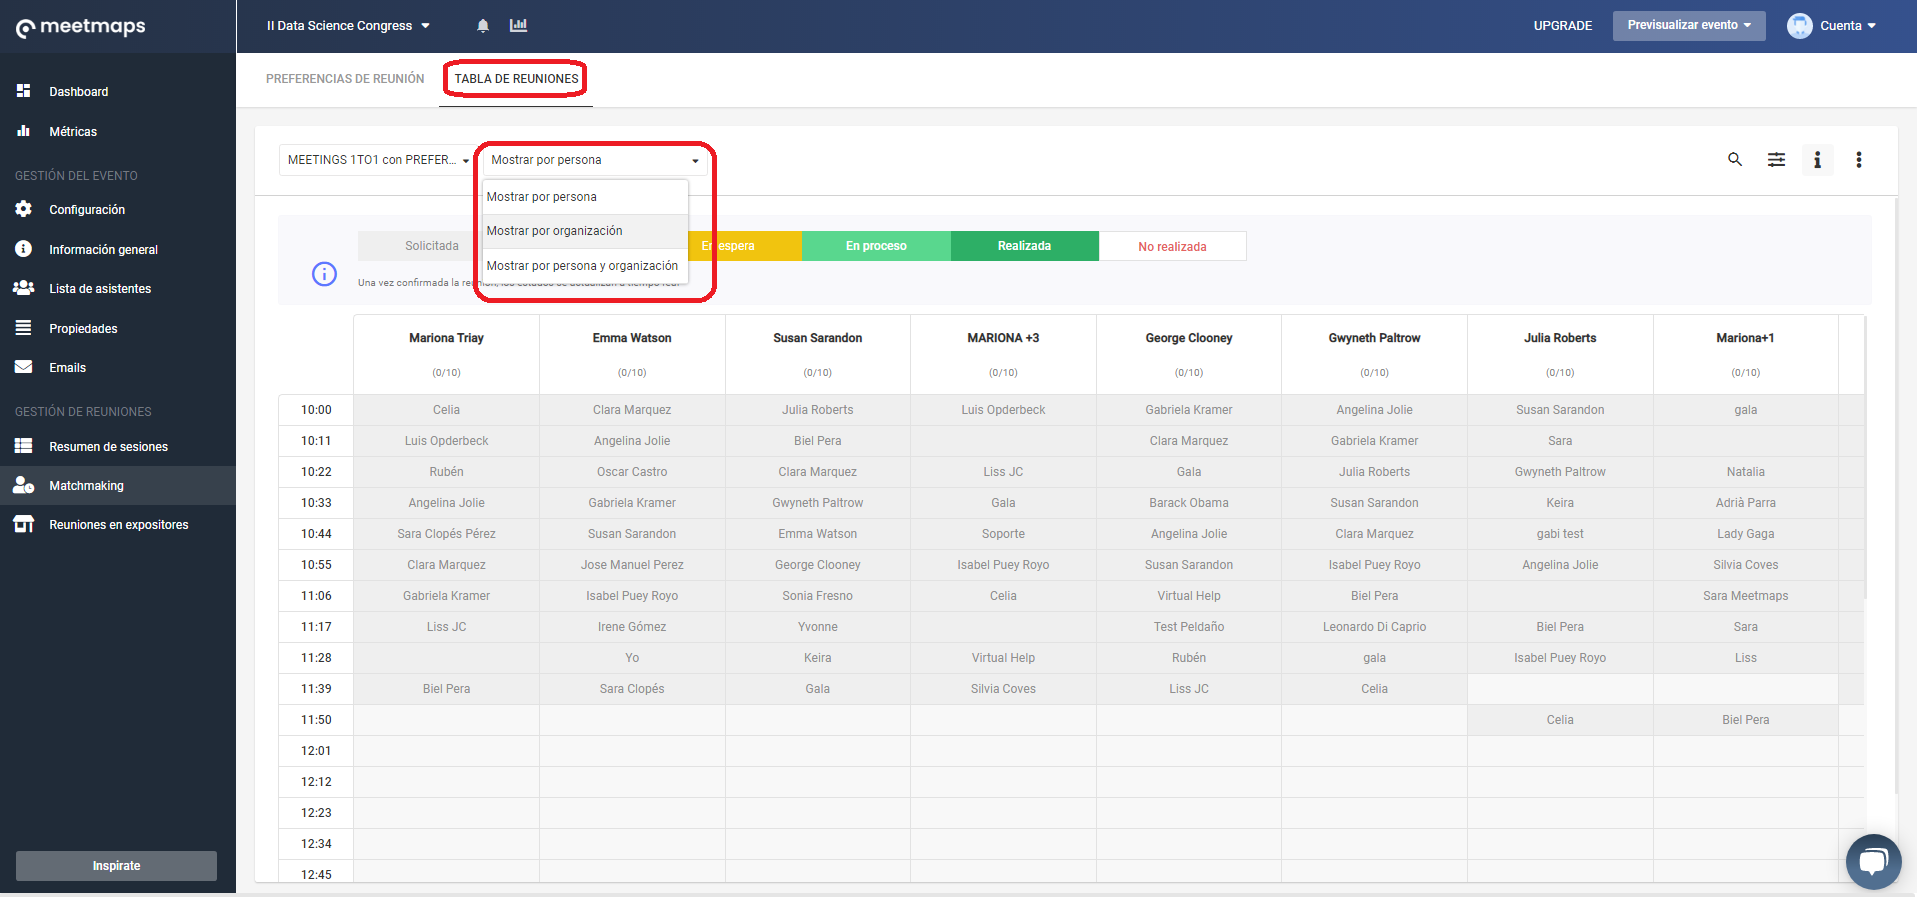
What else is left? Just one final step: go to the "Meetings Table" tab and PUBLISH THE AGENDA 💪.
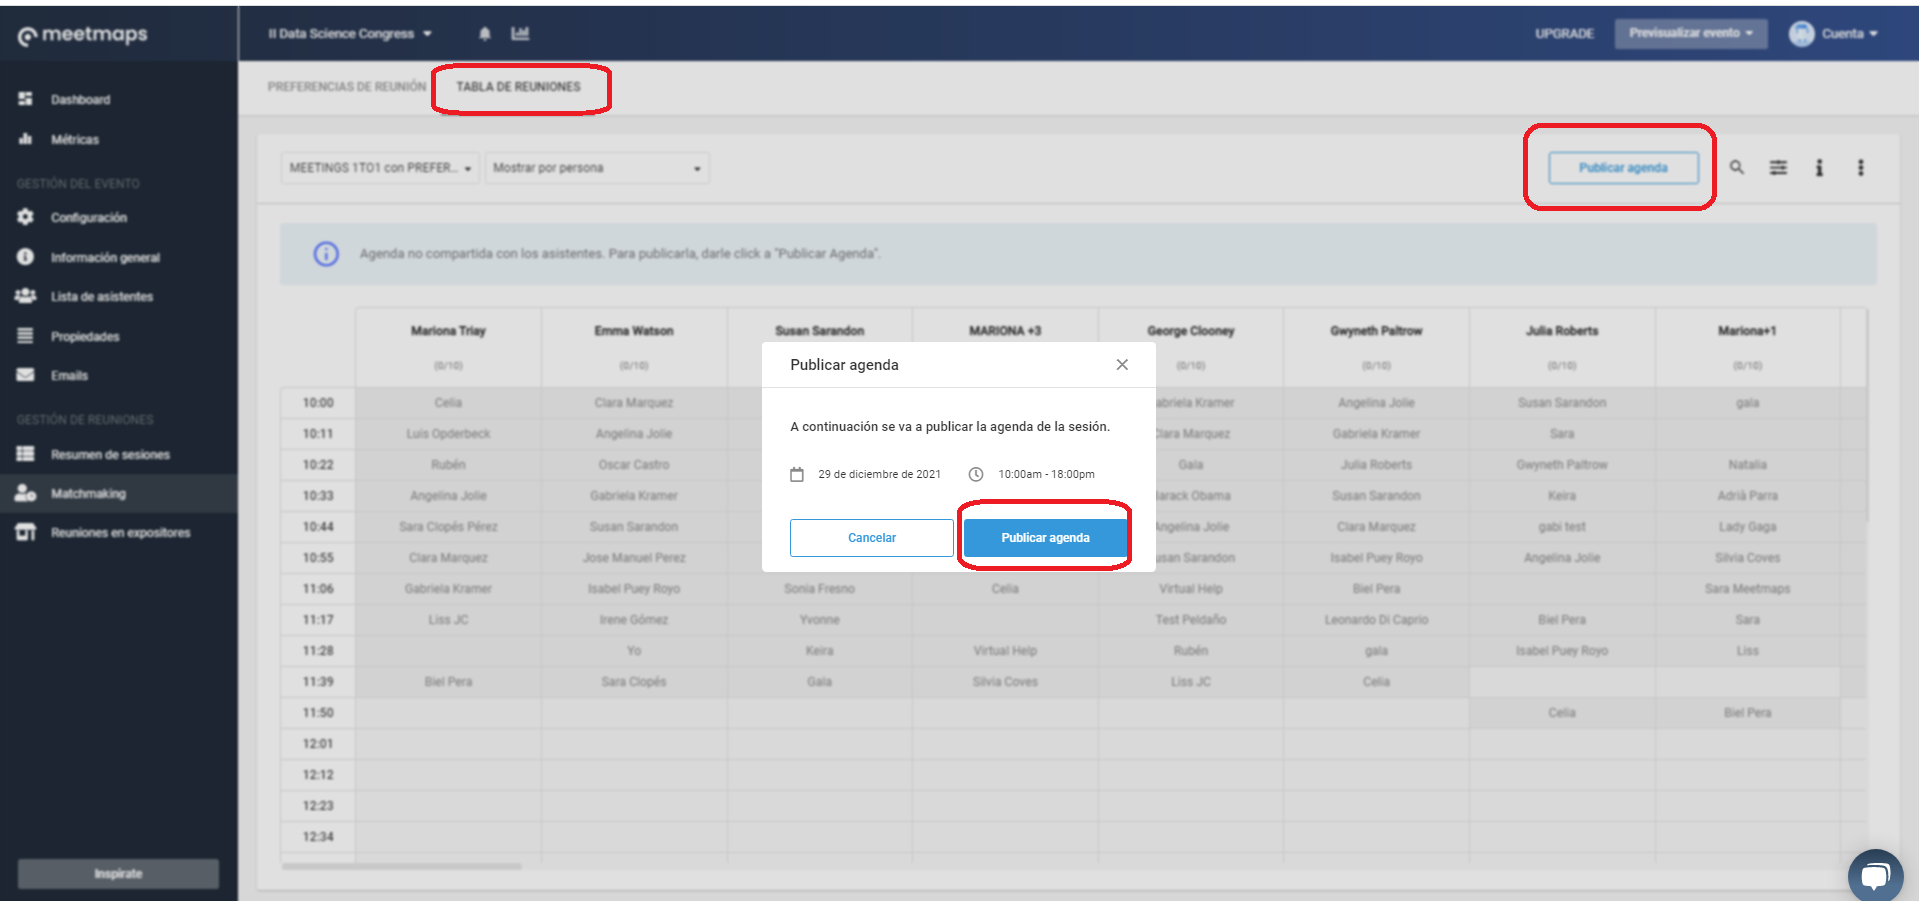
When you publish the agenda, attendees will see in the "My Meetings" section of the Meetings 1to1 session the meetings that have been generated based on their own preferences.
IMPORTANT ❗ When you publish the agenda, we suggest editing the session and turning off the Meeting Preferences switch. This way, attendees will not be able to continue indicating meeting preferences beyond the specified deadline, as the agenda has already been published with the information received up to that point.
In summary
With the Meetings 1to1 with Preferences option 👑, you have the opportunity to learn about attendees' interests and propose meetings while ensuring their quality. It consists of 3 parts:
-
Create the session for attendees to indicate their interests ☑️ until a specific date.
-
Generate the matchmaking 🔄 and assign time slots to ensure that meetings fit into available schedules for both the host and the requester.
-
Publish 📆 the agenda.